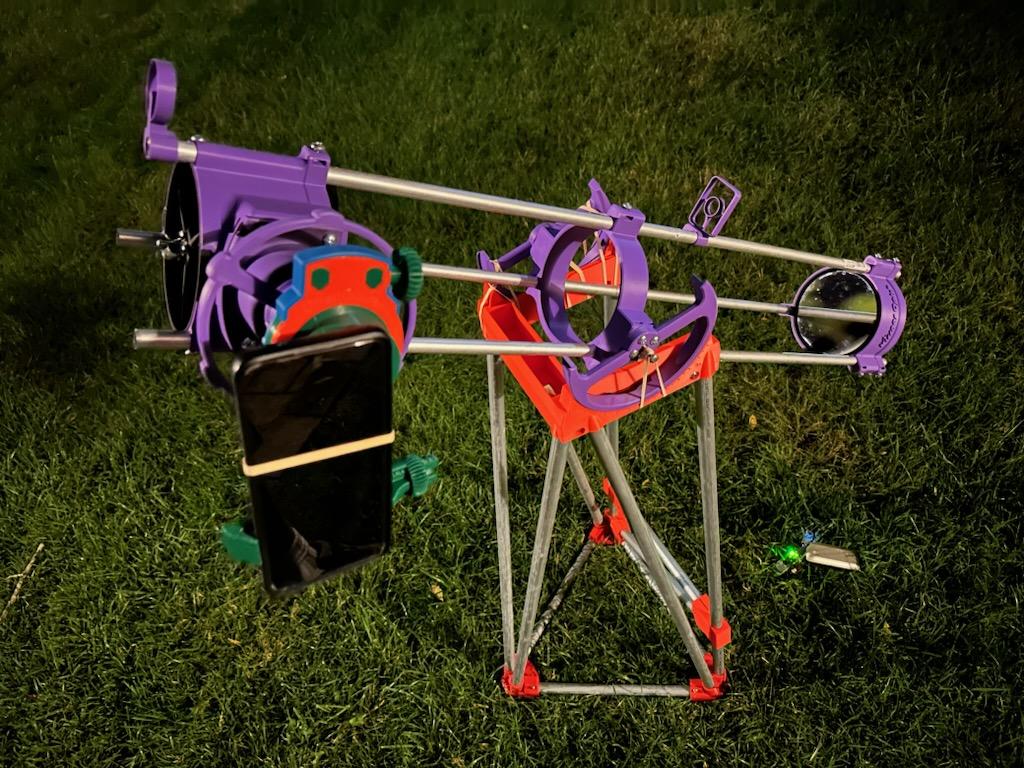
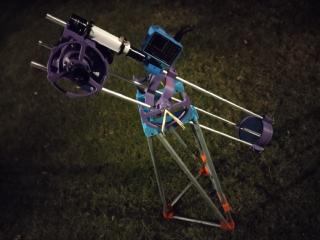
This little 3D printed telescope kickstarted my journey into astronomy. The design is free and open source, and uses 3D printed parts, aluminum tubes, and hardware store nuts and bolts.
It sits on the Hill Mount, a portable and cheap altitude mount I designed that costs around $20. It’s lightweight enough I have walked two miles to a subway stop while carrying it the whole time.
Azimuth is controlled by physically sliding the plastic across the ground. Sure, I could put it on a turntable, but that would make it heavier.
It has a number of upgrades - including an integrated finderscope and a high-tech computerized aiming system I printed and hand-soldered myself.
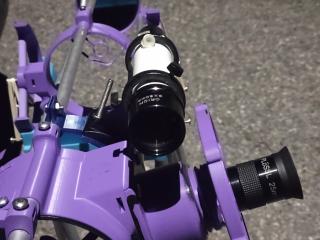
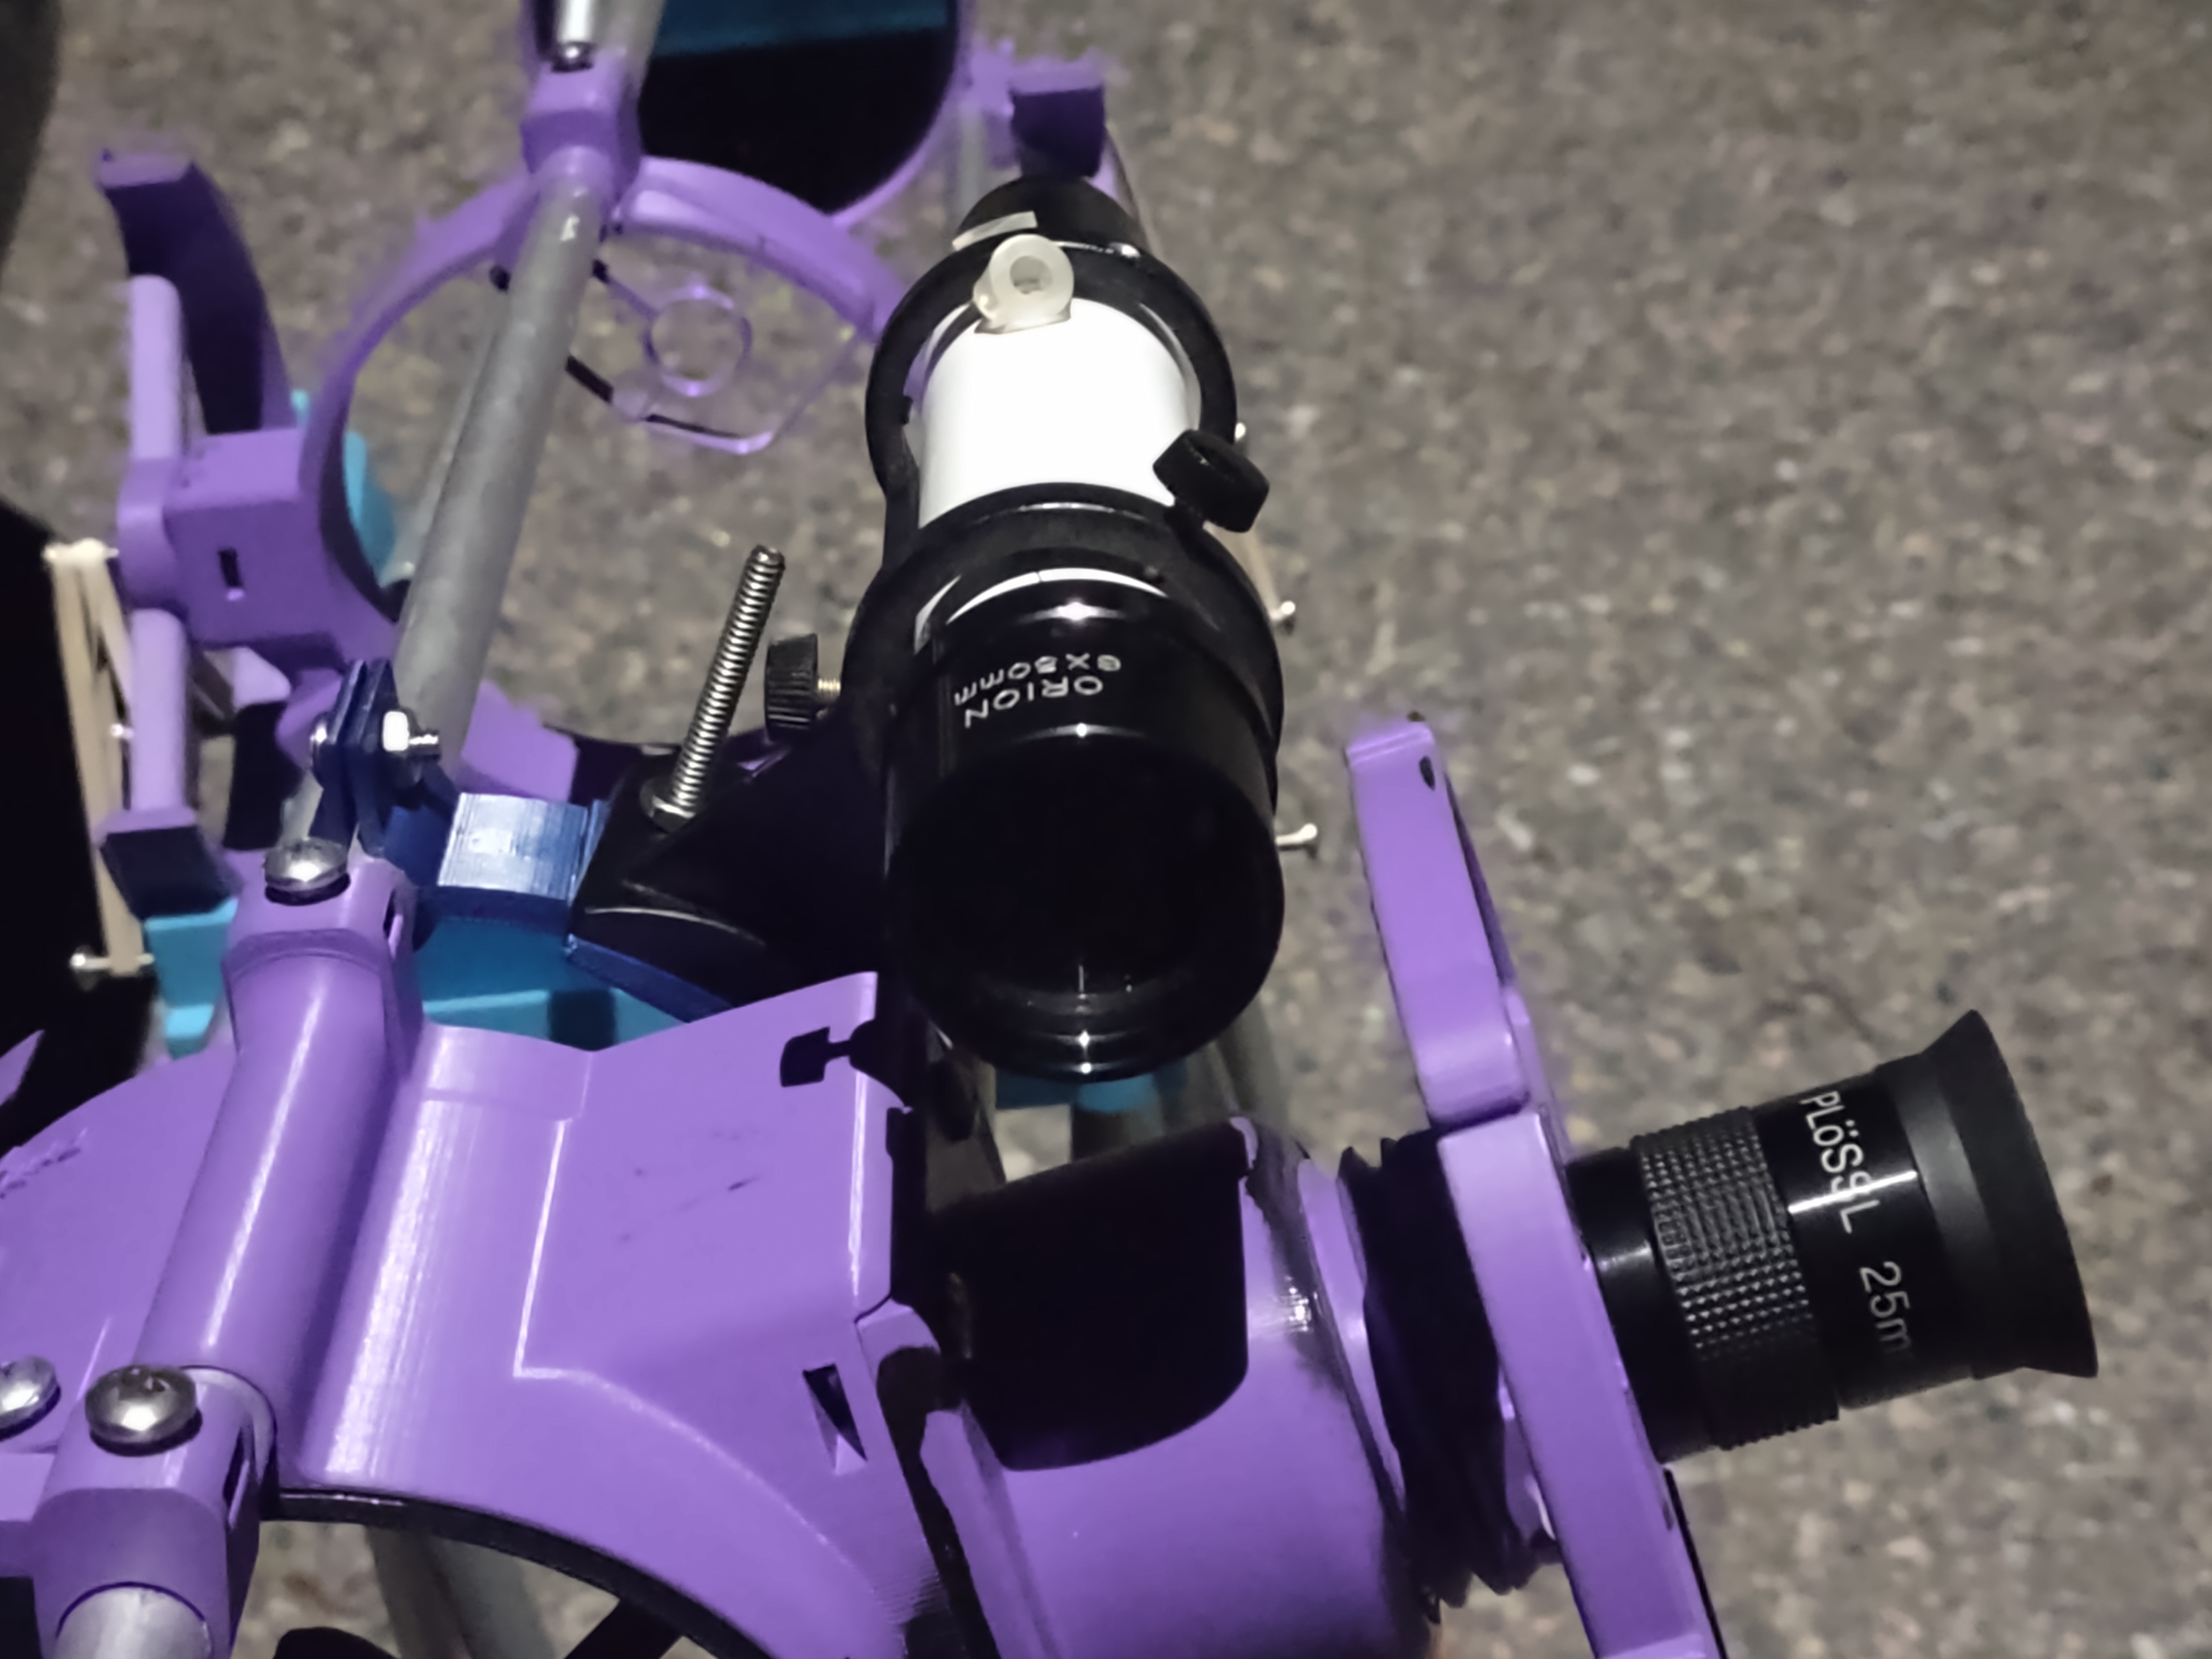
Finderscope
The first upgrade is an 6x50 finderscope that says “orion” on it. I found it in my local astronomy club’s shelf of spare parts and designed a 3D printed adapter for it to fit onto the telescope. It features integrated crosshairs and helps me line up planets at a glance!
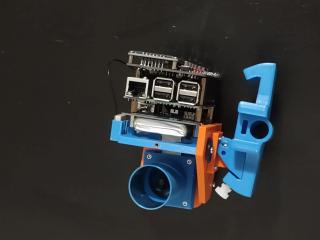
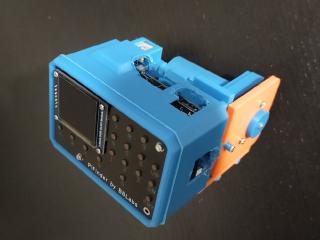
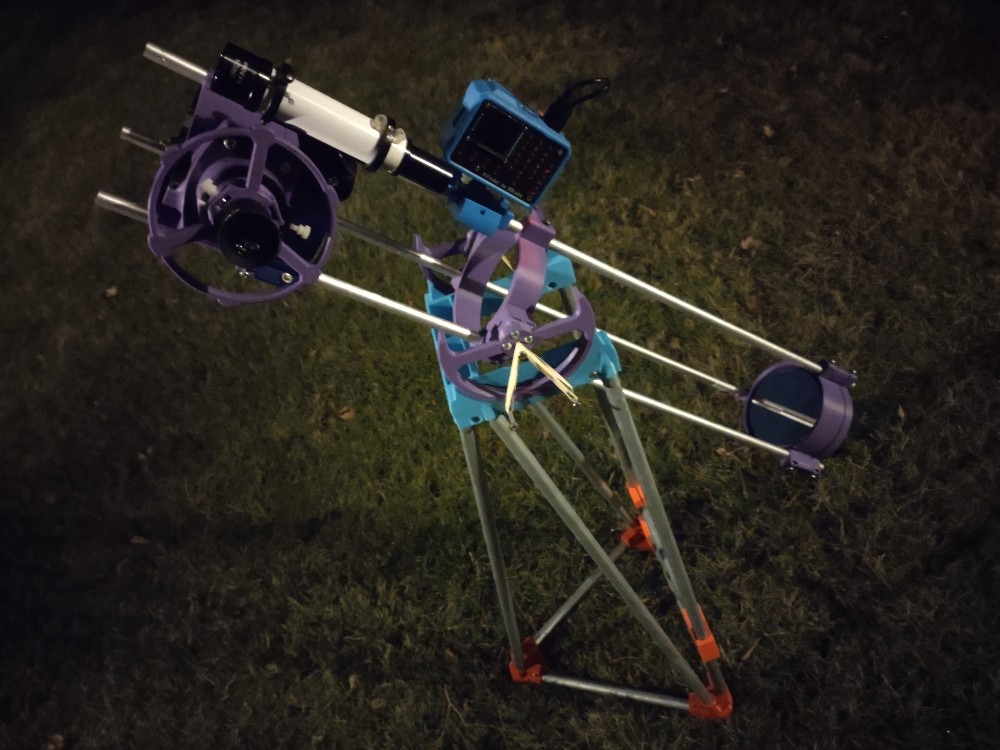
Sliced Pifinder
The second upgrade is the Sliced PiFinder. It’s a targeting computer that permanently lives on my telescope - which is an incredible sentence. We truly live in the future.
The PiFinder is a device that uses a raspberry pi and a camera to take pictures of the sky and compute where in the sky your telescope is aiming, even with high light pollution. Since it knows where the telescope points, you can select a particular galaxy or nebula and it will tell you how to push the telescope to get there.
PiFinders are an open-source project that can also be bought for $500 from the designer. Mine was built for $110 - a mere slice of the cost. The stock PiFinder is designed for a Raspberry Pi 4 using the Raspberry Pi High Quality Camera ($50) with a $50 lens, but I 3D printed and assembled the parts myself, used a scavenged battery pack and previous-generation Raspberry Pi 3 from a defunct project, and a $30 IMX462 camera and $12 lens.
Taking photos on a budget
I like to think of myself as on the cutting edge of cell phone astrophotography. I use a 3D printed clamp to hold my phone up to the eyepiece and take photos using my phone camera. However, tapping the phone button causes vibrations that wobble the telsecope. To fix that, I use a raspberry pi pico microcontroller as a wireless remote shutter. I programmed it to act as a bluetooth mouse and connect to my phone. When I press the built-in button, it moves the mouse to the center of the screen and clicks the “take picture” button. To see pictures this setup has taken, take a look at my Astrophotos page!
| 1 min
| 68 words
turns out it’s…
click to reveal the first one?? 3D printers fill the inside of objects with really lightweight infill, and it's so light compared to 100% filled walls that it takes both less time and ends up being less weight than the fancy truss on the right. Which sucks because I spent such a long time designing that fancy truss only to be outdone by a brick.
| 1 min
| 99 words
I heard there was a meteor shower tomorrow! So naturally I went out today to see it. First I treated it like any other target and tried to find a good gap in the trees to see Perseus, but then I read online that meteors appear in the full sky, not just at the radiant.
So I lay down on the sidewalk, and 30 minutes later… zoop!
The meteor was super underwhelming compared to the time I spent waiting.
Read More
| 1 min
| 31 words
Everything was very blurry today and I kept wondering why focusing didn’t seem to fix it before realizing it was cloudy.
My custom Pico Bluetooth picture taking button worked great though!
| 6 min
| 1264 words
It all started with an idea for better telescope images.
I take photos using my phone. My telescope shakes when I press the capture button. I have a raspberry pi pico W, which recently added bluetooth. I wonder if I can connect the pico to my phone as a bluetooth device so I could press a button on the pico and remotely take a snapshot.
Bluetooth is a nightmare the C++ standard is a mess of inscrutable acronyms.
Read More
| 1 min
| 55 words
I take photos using my phone. My telescope shakes when I press the capture button. I have a raspberry pi pico W, which recently added bluetooth. I wonder if I can connect the pico to my phone as a bluetooth device so I could press a button on the pico and remotely take a snapshot
| 2 min
| 238 words
I got the Andromeda galaxy!!!
Aiming the telescope was a nightmare. “I’ll use a star app to aim!” I thought. I tried downloading Stellarium, it complained about a Google Play error. I downloaded SkEye, and it had some weird gyro issues because it expected the phone to be pointing in the same direction as the telescope, but I use my phone camera to take pics so it was mounted sideways looking at the telescope’s eyepiece.
Read More
| 2 min
| 279 words
I finally finished Hill Mount v3, so I put it to the test. I got the clearest phone-cam Saturn I’ve ever seen! Wobbles still exist if you touch the telescope, but the wobbles are much smaller now and go away if I wait a few seconds or use a short exposure time.
Before the wobbles settle down, if you take a picture with a big exposure time, the wobbles cause the image to have two Saturns.
Read More
| 1 min
| 65 words
This mount is my stiffest one yet!
Changes from last time:
uses steel EMT instead of wooden dowels, for extra stiffness flat sides so you can see the degree markings deeper and more visible degree markings It feels pretty darn stiff! Unfortunately, tapping the side still makes the telescope wobble. It’s definitely much less wobble than before, though. Maybe it’ll be enough for clear pictures!