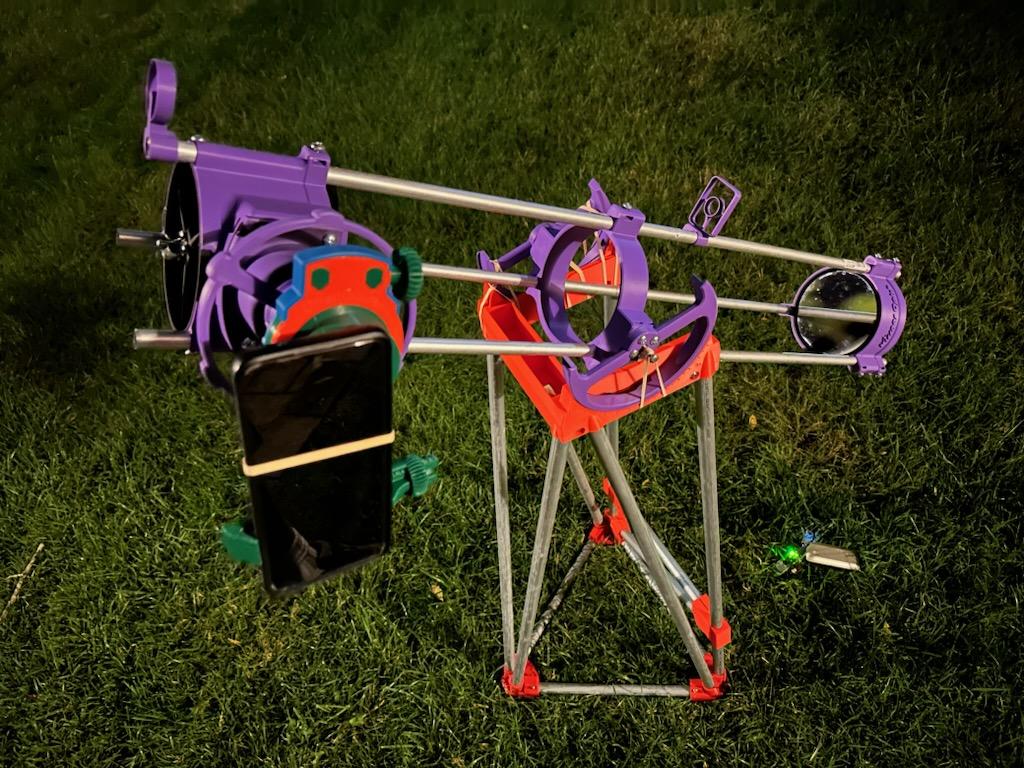
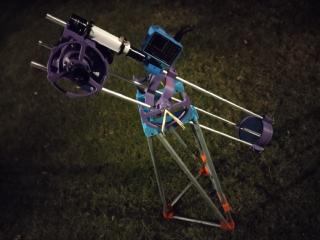
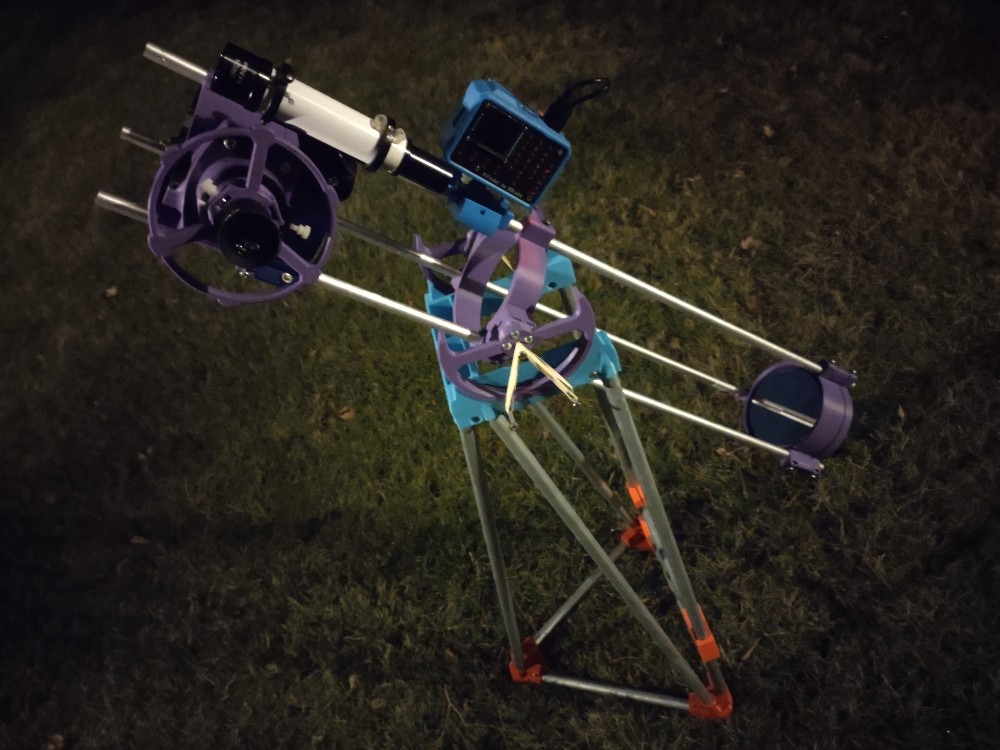
This little 3D printed telescope kickstarted my journey into astronomy. The design is free and open source, and uses 3D printed parts, aluminum tubes, and hardware store nuts and bolts.
It sits on the Hill Mount, a portable and cheap altitude mount I designed that costs around $20. It’s lightweight enough I have walked two miles to a subway stop while carrying it the whole time.
Azimuth is controlled by physically sliding the plastic across the ground. Sure, I could put it on a turntable, but that would make it heavier.
It has a number of upgrades - including an integrated finderscope and a high-tech computerized aiming system I printed and hand-soldered myself.
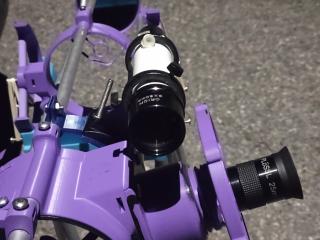
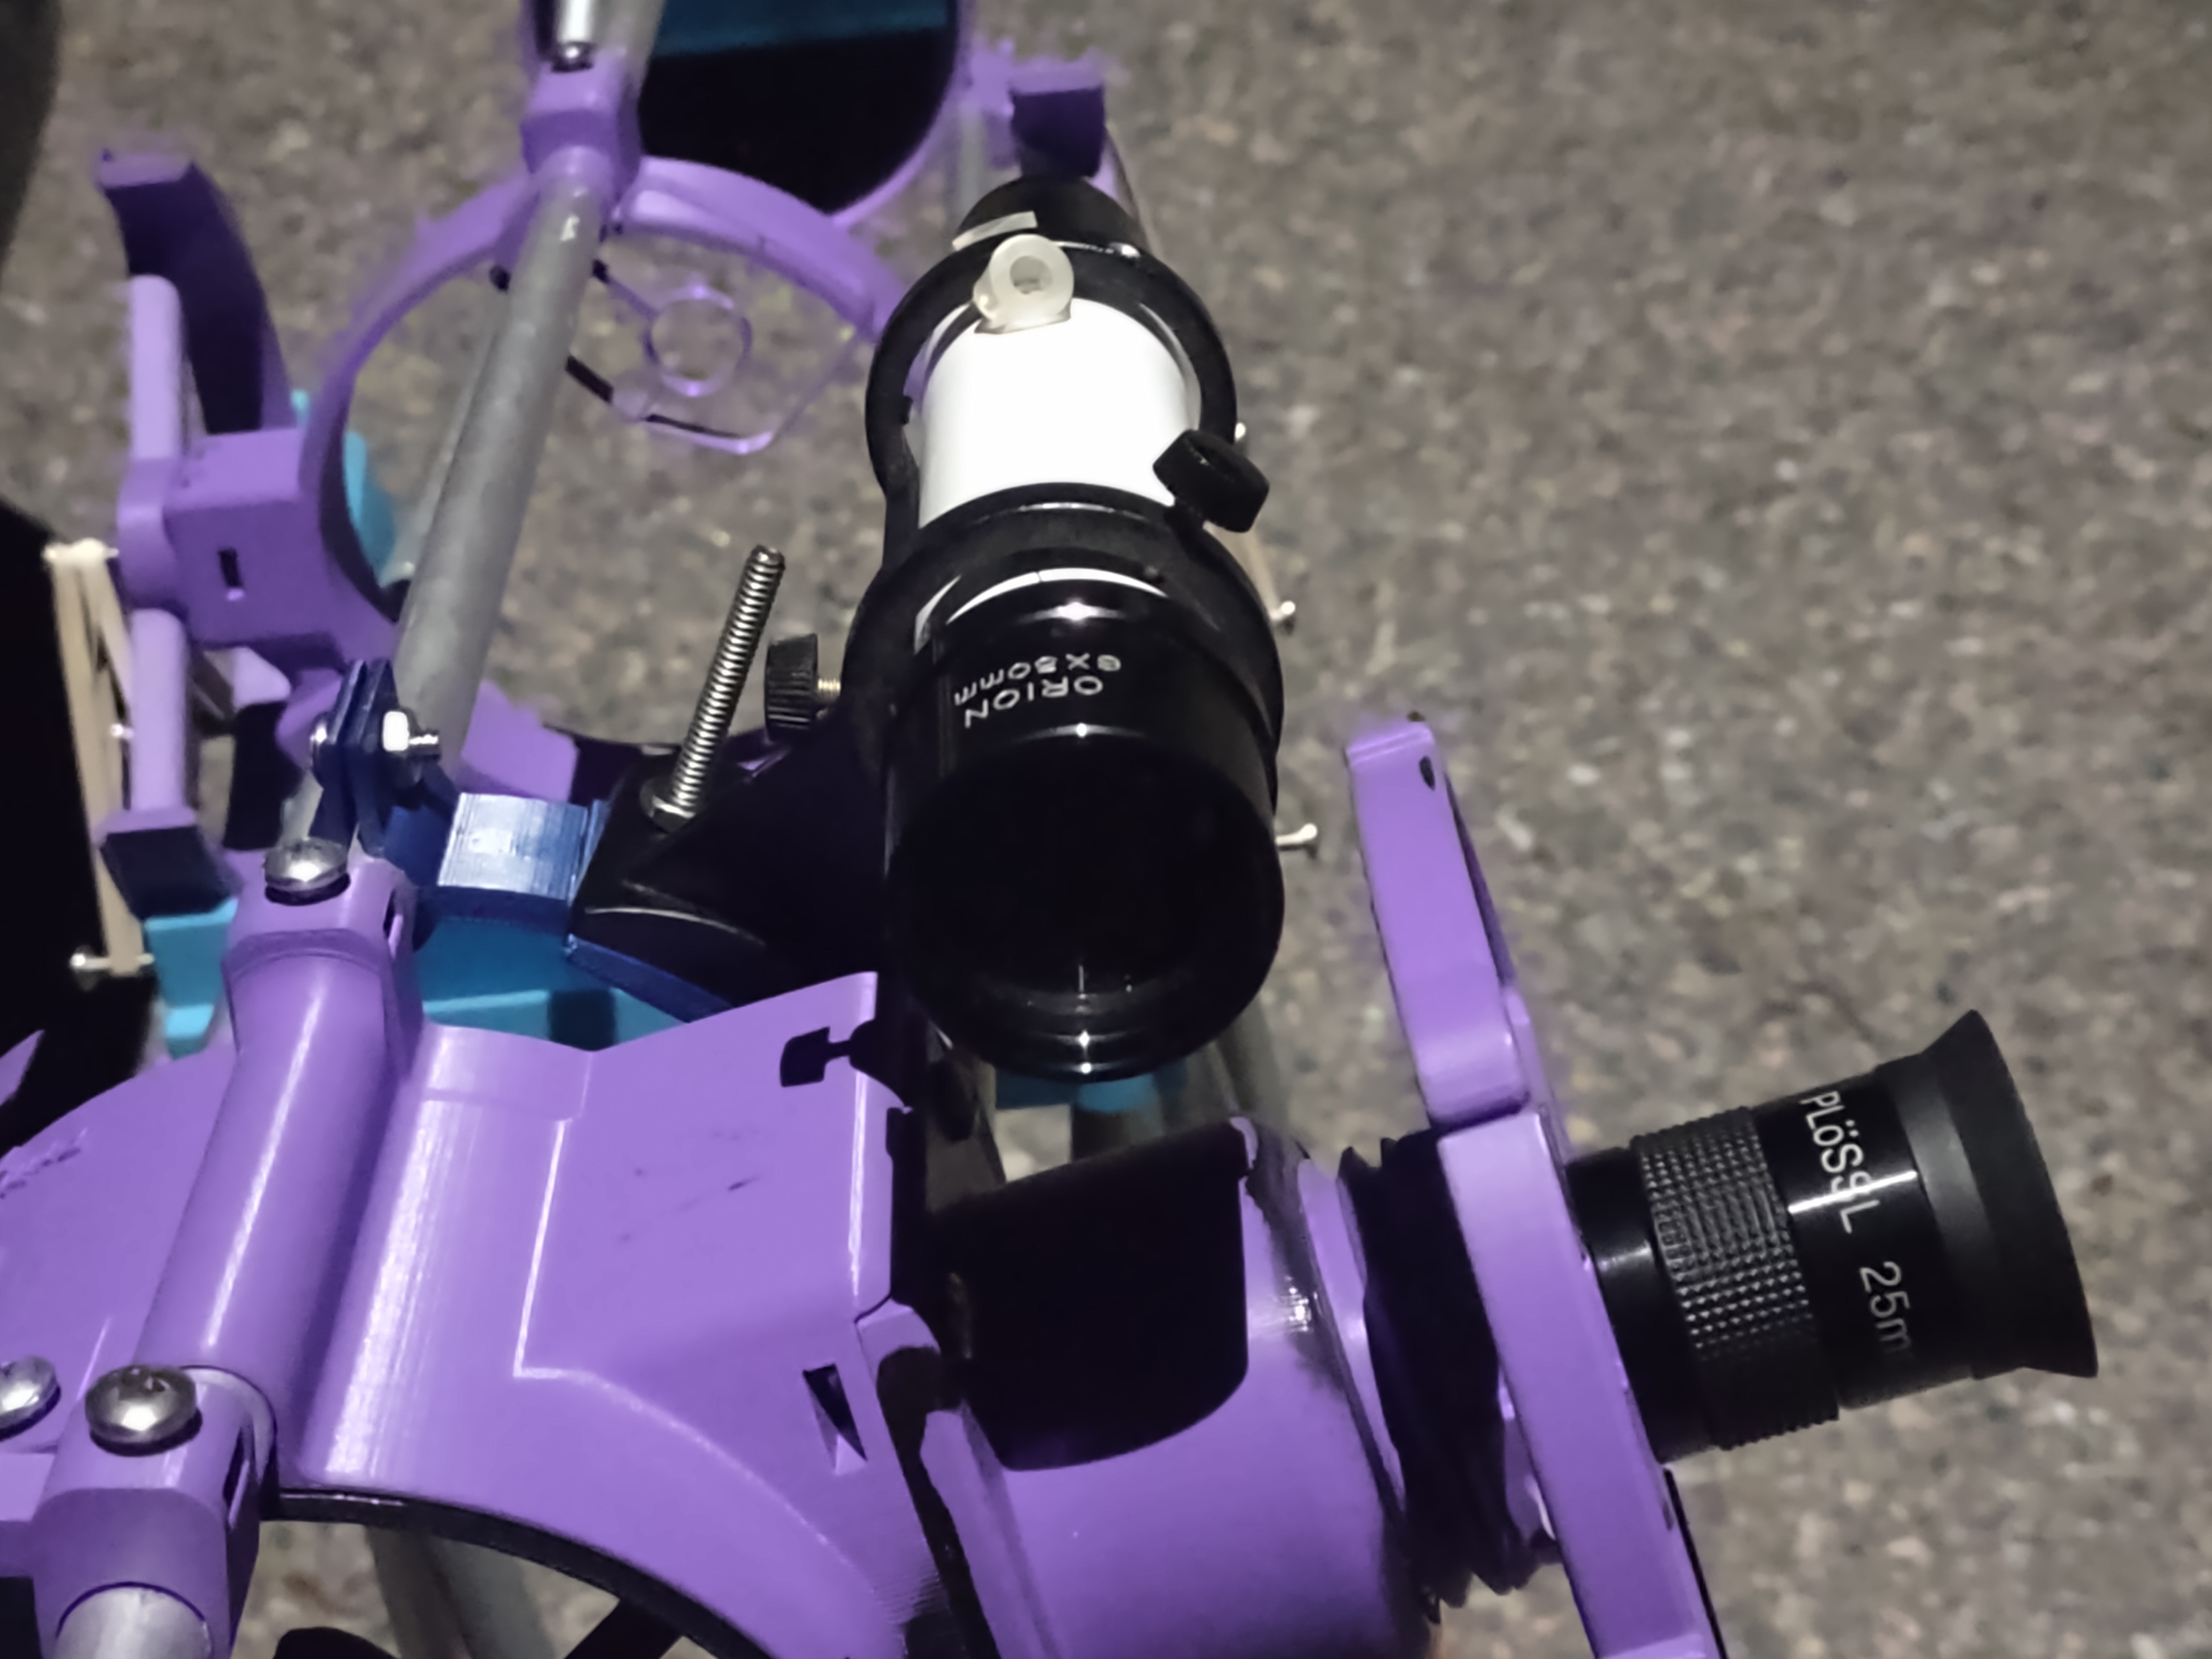
Finderscope
The first upgrade is an 6x50 finderscope that says “orion” on it. I found it in my local astronomy club’s shelf of spare parts and designed a 3D printed adapter for it to fit onto the telescope. It features integrated crosshairs and helps me line up planets at a glance!
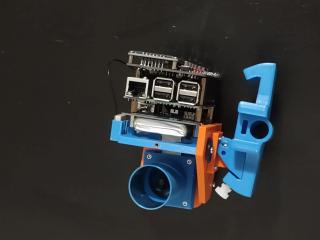
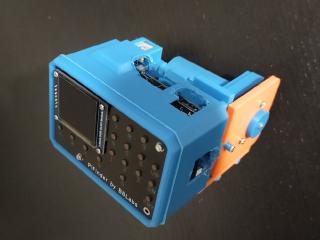
Sliced Pifinder
The second upgrade is the Sliced PiFinder. It’s a targeting computer that permanently lives on my telescope - which is an incredible sentence. We truly live in the future.
The PiFinder is a device that uses a raspberry pi and a camera to take pictures of the sky and compute where in the sky your telescope is aiming, even with high light pollution. Since it knows where the telescope points, you can select a particular galaxy or nebula and it will tell you how to push the telescope to get there.
PiFinders are an open-source project that can also be bought for $500 from the designer. Mine was built for $110 - a mere slice of the cost. The stock PiFinder is designed for a Raspberry Pi 4 using the Raspberry Pi High Quality Camera ($50) with a $50 lens, but I 3D printed and assembled the parts myself, used a scavenged battery pack and previous-generation Raspberry Pi 3 from a defunct project, and a $30 IMX462 camera and $12 lens.
Taking photos on a budget
I like to think of myself as on the cutting edge of cell phone astrophotography. I use a 3D printed clamp to hold my phone up to the eyepiece and take photos using my phone camera. However, tapping the phone button causes vibrations that wobble the telsecope. To fix that, I use a raspberry pi pico microcontroller as a wireless remote shutter. I programmed it to act as a bluetooth mouse and connect to my phone. When I press the built-in button, it moves the mouse to the center of the screen and clicks the “take picture” button. To see pictures this setup has taken, take a look at my Astrophotos page!
| 1 min
| 65 words
I looked at mars with my 4.5" telescope. Previously it just looked like a big circle, but adding a 2x barlow lens to get to 150x zoom made it big enough I could make out a tiny line of slightly darker area on Mars! That’s the first time that I saw any detail on mars! That’s neat, but also wow my standards are so low.
| 1 min
| 45 words
Cell phone pic of Comet Tsuchinshan-Atlas!
It was visible faintly in the sky by eye too!
Weridly it seemed brighter by eye than through the telescope. That could be because my telescope wasn’t shielded from a nearby streetlight and stray light created a brighter background?
| 1 min
| 79 words
Taken using my 4.5" telescope and phone! Both Mars and Jupiter fit into telescope view!
Very annoying observing session. Tried to take photos of the ring nebula but missed; planet conjunction was extremely slightly out of focus and I didn’t see until morning, and I looked for but still couldn’t see M33. Couldn’t see any detail on mars by eye either; that should change as we get closer to opposition.
Read More
| 1 min
| 84 words
Since Orion was so high in the sky compared to my last photo I was curious if photos would look better… and they do!
This is one 1/2s phone pic, scaled to hell and back to bring out the “bat wings”: big dark edges that go from bottom left to top right. Now I know there’s many ways to make this better, such as motorizing or a bigger telescope or stacking multiple pictures - but for just one phone pic this isn’t that bad!
Read More
| 1 min
| 28 words
A quick moon pic from my 3D printed telescope and phone cam. Some out of focus tree branches snuck into the top and traced some faint dark lines!
| 2 min
| 239 words
I drove out to what Google maps said was a park and then saw a sign saying “state property no trespassing” and a second sign saying “don’t steal road salt or gravel from here, if we catch you you’ll be prosecuted”. I guess that’s what some silly rural fellows get up to in their free time? So I parked right in front of the entrance off the side of the road, since it was pretty dark.
Read More
| 1 min
| 137 words
This is the best photo I’ve made of the Andromeda galaxy!
It’s my second time stacking pictures to bring out faint details. You’re looking at 20 phone pics taken through my 3D printed telescope, each 1/2s exposure so the Earth didn’t rotate as much during the photo and smear the stars. I tried the program deepskystacker, but it failed to stack my pictures (maybe my phone camera’s pics had too much noise?
Read More
| 1 min
| 59 words
BEHOLD, MY FIRST STACKED ASTROPHOTOGRAPHY IMAGE!
This combines 20 1/2sec exposures taken with my phone through my 3D printed 4.5" telescope. You can see stars down to magnitude 12!! This is so cool.
Turns out I didn’t see a galaxy in my photos because… I was looking at photos of a non-galaxy. This is the ring nebula, M57. Oops.
| 1 min
| 45 words
I took many 1/2s exposures of the galaxy M33 but it wasn’t visible. I’m trying to combine them in python to see if together it can simulate a long exposure. It’s not going too well
(The lines are from stars moving as the earth rotates!)